

This is the final post on the package display! You can find part 1 ◄here and part 2 ◄ here. The nice thing about making your own boxes, is that your package display can be as big or small as you want!
Preparing The Big Box
The big box is made from the inside out. In retrospect, it could have been more easily made like the other two boxes and I think it would be plenty sturdy enough. Too late for me, so here we go with how to wrap these.
First, you will want to add some of the brown tape to any edges that are not folded. Also, tape any indentations and try not to press the tape down into the indentation. Because of its size and the amount of cardboard I had on hand, you can see I utilized the carton flaps, too. I should have kept the best cardboard for the outside. Well, I did. Then, I wanted it just about a half-inch bigger. No big deal. Just tape it.
Next, cut off a piece of wrapping paper long enough to cover all four sides + 2 or 3-inches of overhang. Lay the box on its side lengthwise across the width of the paper so one end of the length of paper will cover one side and wrap around the top with the 2 or 3-inches you allowed for overhang. Make sure the opposite end is cut in a nice straight line and will line up with the edge before gluing.
Brush Mod Podge on one side of the box and 2 or 3-inches on the adjoining top side. Gently pull the paper up, smoothing it from the bottom upward and over the top side. (We are an Amazon affiliate and may receive a small percentage of any sales through this link at no cost to you. Thanks for supporting this website!)
Turn the box over with the glued side down. Brush the Mod Podge on the next side, smoothing from the previously glued edge to the opened edge of the wrapping paper. Repeat until all sides are glued.

Then, turn the ‘box’ over so that the end of the gift wrap is facing down. Fold the left side into the middle and crease the paper. Fold the right side into the middle and crease. Open up and brush Mod Podge on the left flap, fold up, and glue to the flap and box, smoothing with your hand. (See the picture.)
Fold the left side to the middle, crease the top end, and cut a flap where the paper covers the opening so it will tuck inside when you glue it. Turn the box to the left and brush glue onto the inside of the paper. Repeat on the opposite side.

Fold one of the remaining triangular flaps to the center and brush glue over the entire inside of the flap, smooth with your hand toward the center, and fold inside the opening. Repeat on the opposite side.
The Lids For The Big Boxes
Make the lids the same way the smaller lids were made. Click here for ►step by step instructions. These boxes ended up being 13.5-inches square on top and the flat part of the lid is a 14-inch square. The lid sides were cut to 3-inches wide.
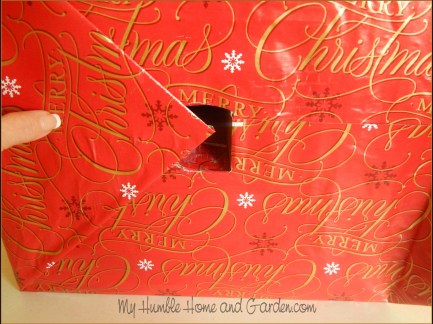
You must cut a hole in the top of the lid, just as we did with the middle-sized box. This will allow the pole to be positioned down through the boxes and a string of lights to be strung through the opening. The pipe is a 1-inch pipe and the hole here is a 1-1/2-inch hole. This gives just enough room to squeeze the lights through with the pipe.
Wrap the lids in the same manner as the other two lids. Click here for ►step by step instructions.
Following the directions on the jar, apply 3 coats of the outdoor Mod Podge to the entire gift-wrapped surface of the packages and the lids. Allow the packages and lids to dry for 72 hours.
The Ribbons and Bows
Adding the ribbons and bows to this package display is really very simple but what a difference they make!

The Small Boxes
After the Mod Podge has dried, lay a length of ribbon on a work surface and place the box, one open end up and one down, on top of the ribbon. Place the lid on top. Pull the ribbon up over both sides, center, and loop one side of the ribbon over and under through the loop in an overhand knot. Pull up tight and twist slightly to hold this position. If you are using wired ribbon, it will hold the position with a simple twist.
Now, take the ribbon roll and leaving a tail, start making loops for a bow. I usually make 6-8 loops for most bows. Depending on the look you want, you can make fewer or more. (Click here for a step by step post on ►how to make bows.) Clip the ribbon leaving another tail.
Once you have the loops ready, place the loops on top of the twisted overhand knot, and tie the two tails of the ribbon wrapped around the box around the middle of the bow. Pull this up tightly, securing the bow.

(This is a picture of the middle-sized box, but connecting the ribbon to the bottom of the smallest is the same.)
Turn the box on its side and cut the ribbon spanning the bottom of the box in half. Brush Mod Podge on the back of the ribbon, center it on the inside of the box, pulling the ribbon taut, glue to the inside of the box. Repeat with the other tale of the ribbon.

Then, manipulate the wired ribbon into a beautiful bow. The wire will help shape the loops and retain that shape. The gift should look nice now but add some Christmas floral picks and it will look striking!
Notice that the picks I chose echo the red, gold, and green of the wrapping papers. I combined two picks to achieve this look. Obviously, you only need to put the picks and bows on the top packages if you are stacking them!
The Medium-Sized Boxes And Lids

Wrap the middle-sized boxes just as the small boxes and allow to dry for at least 72 hours. Then, place the lid on the box. Instead of tying the ribbon on the top, cut a ribbon and make a 3-4-inch tail and bend to the inside of the circular opening in the top. You can glue these down but the wire holds them inside if you bend the ribbon giving you the option of removing the lid if necessary.
Run the ribbons down the sides of the box and cut, leaving an extra 3 or 4-inches, and glue to the inside of the box. See the picture.
The Large Boxes

I saw two gift boxes stacked at Mi Salon where I was waiting to have my nails done. The top box had a bow on top of it and the lower box had a ribbon wrapped around the sides and a bow attached. That gave me the idea to place a bow on the side of the large box. The bow is not as erect as I might like. I might use some straight pins to hold the top loops up better by pushing the pin through a loop and into the cardboard.
It’s a little different from the more expected stack of boxes.
Stacking The Boxes And Adding Lights To The Package Display
Choose where you are going to place the boxes. I am placing these on top of two large pots on the front stoop. First, thread the string of lights through the hole in the large boxes and place the box where you want it. Leave enough of the string of lights protruding from the bottom to wrap around the biggest box.

Place the lid on the box and insert the pipe in the hole. When this is in the flower-pot, the pole will be pushed into the soil.

Next, place the middle box over the PVC pipe and fish the string of lights through the opening in the lid leaving enough to wrap around the base of the box.

Place the smallest box on top of the middle box and wrap the string of lights around the base. I’m thinking I should cut a piece of Styrofoam to wedge inside this small box and make an opening to run the end of the PVC pipe through it for added support. I could probably use cardboard to do that, too.

Around the base of the boxes, some branches from the magnolia tree will cover the soil in the pot. The freezing rain and ice broke a couple off earlier and they will be put to good use. Can’t wait to get this Christmas Package Display set up outside! Pictures to follow!
Click ‘Follow’ for the newsletter below, or follow me on Facebook, Pinterest, or Google so you won’t miss anything!


